
Ready to Document Your First Experiment?
Your First Experiment: A Step-by-Step Digital Documentation Guide
Last week, we talked about what digital lab notebooks are and why researchers are switching. Now let's get hands-on.
This article isn't theory. It's a complete walkthrough of creating your first experiment in ELabELN—from logging in to clicking save. Every step, every click, exactly what you'll see and do.
By the end of this guide, you'll know exactly what the experience feels like. And honestly? Most people are surprised by how simple it is.
What We're Going to Do
We're going to document a realistic experiment together: a simple gel electrophoresis run. Nothing fancy, nothing complicated—just the kind of everyday documentation you do all the time.
Here's the complete journey:
- Get access to your ELabELN account (2 minutes)
- Set up your first experiment (3 minutes)
- Document your experiment with protocol and results (5 minutes)
- Add an image and organize with tags (2 minutes)
- Save and search for it (1 minute)
Total time: About 10-15 minutes for your first time through. After that? You'll be documenting experiments in 3-5 minutes.
Let's start.
Step 1: Get Access to ELabELN (2 Minutes)
Head to elabeln.com/get-started to request a demo or get your team set up with the ELabELN Suite.
Once your account is provisioned, you'll receive login credentials by email. Click the link, sign in, and you're ready to go.
You'll land on your dashboard. It's empty right now—that's normal. You're about to fill it.
Step 2: Understanding Your Dashboard (30 Seconds)
Before we create anything, let's get oriented. Your dashboard has a few key areas:
- Top navigation: Experiments, Resources, Scheduler, Team, Tools
- "Create New Experiment" button: This is your starting point
- Recent experiments list: Empty now, will show your work as you create it
- Search functionality: Found under Experiments and Resources—you can search from "My Experiments" or "My Resources" pages
- Categories/filters: Options to organize and view your experiments
Don't worry about memorizing this. It'll make sense as we use it.
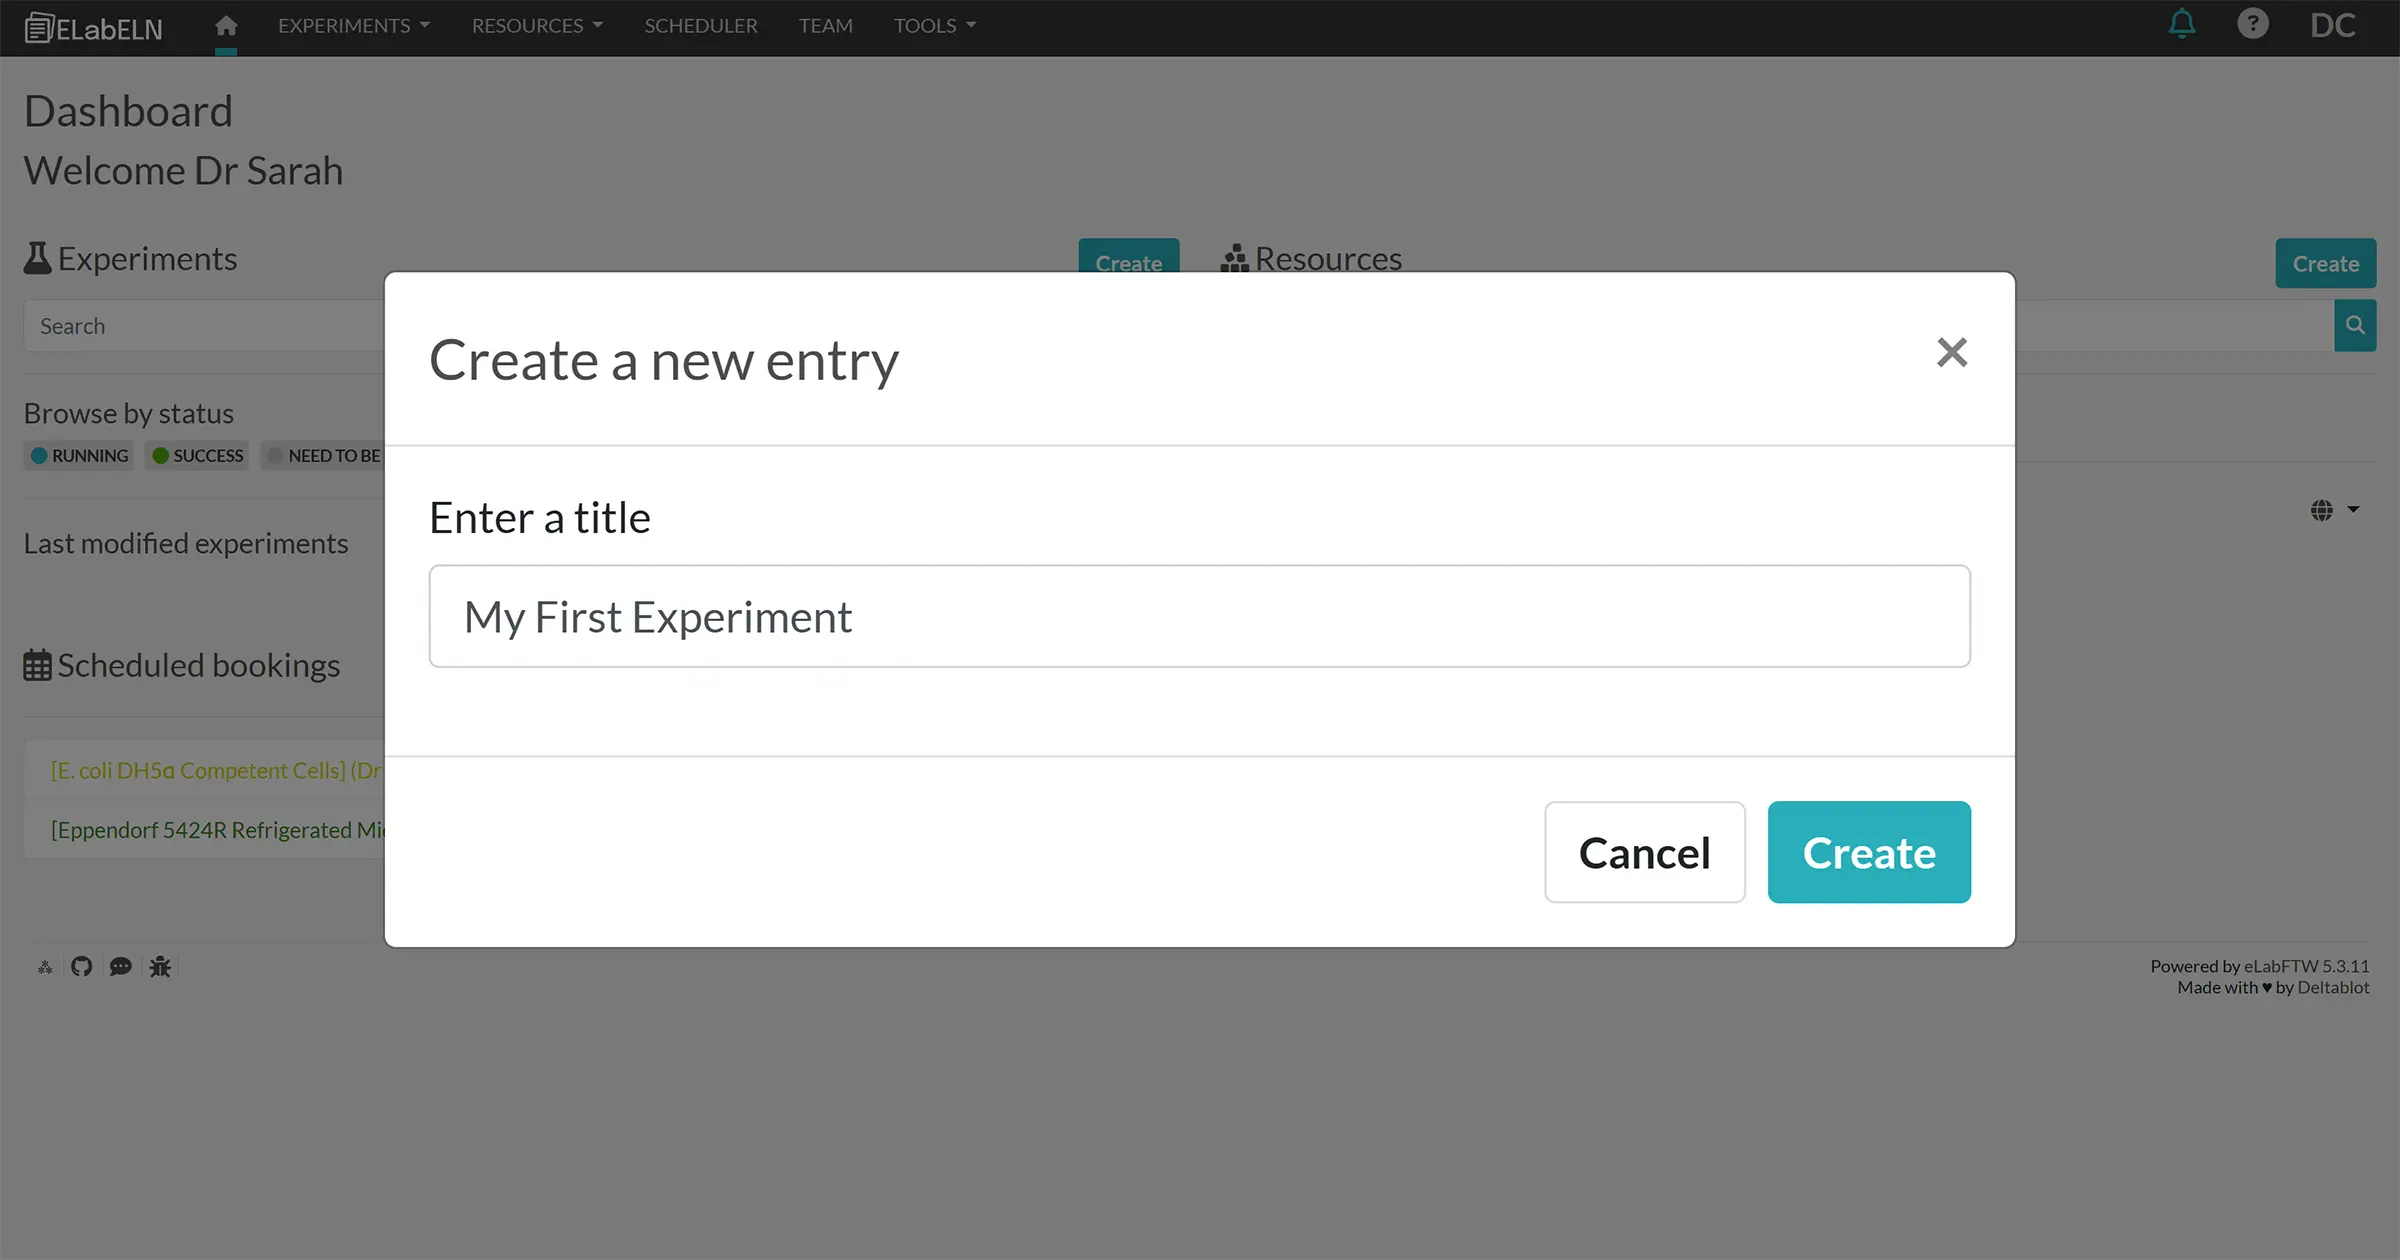
Step 3: Create Your First Experiment (5 Minutes)
Click that big "Create New Experiment" button.
You'll see options:
- Start from blank: Empty experiment, fill in everything yourself
- Use a template: Pre-structured format for common experiments
For your first time, start from blank. We'll create a simple template later, but let's understand the basics first.
The Experiment Form
You'll see several sections. Here's what to fill in for our gel electrophoresis example:
1. Title (Required)
Type: Gel Electrophoresis - PCR Product Verification
Or whatever makes sense for you. Be specific enough to find it later.
2. Status (Optional)
Set to: "Running" or "Completed" depending on whether you're documenting as you work or after the fact.
3. Tags (Optional but Useful)
Add: PCR, gel electrophoresis, DNA verification
Tags make searching easier later. Add anything you might search for.
Step 4: Document Your Protocol and Observations (5 Minutes)
Now comes the main content. You'll see a large text editor—this is where your experiment lives.
The editor has formatting tools (bold, italic, lists, headers) just like Word or Google Docs. Use them or don't—your choice.
Here's what to type for our gel example:
Sample Experiment Content:
Objective:
To verify successful PCR amplification of the target gene (500 bp expected product) using agarose gel electrophoresis.
Materials:
- 1% agarose gel
- 1X TAE buffer
- DNA samples: PCR products from samples A1, A2, A3
- DNA ladder (100 bp)
- GelRed stain
Protocol:
- Prepared 1% agarose gel in 1X TAE buffer with GelRed stain
- Loaded 5 μL DNA ladder in lane 1
- Loaded 8 μL PCR product + 2 μL loading dye in lanes 2-4 (samples A1, A2, A3)
- Ran gel at 100V for 45 minutes
- Imaged under UV transilluminator
Results:
- All three samples showed clear bands at approximately 500 bp
- Sample A1: Strong band, good yield
- Sample A2: Strong band, good yield
- Sample A3: Slightly weaker band but still visible
- No non-specific amplification or primer dimers observed
Conclusion:
PCR amplification successful for all three samples. Target gene confirmed at expected size. Ready to proceed with cloning.
Type this out (or copy-paste if you're documenting something you already did). Use the formatting tools to make headers bold, create numbered lists, whatever makes it readable for you.
Step 5: Add Your Gel Image (2 Minutes)
You have a gel image on your computer (or phone). Let's add it to your experiment.
Two ways to do this:
Method 1: Drag and Drop
- Find your gel image file on your computer
- Drag it into the text editor
- Drop it where you want it to appear
- Done. The image is now embedded in your experiment.
Method 2: Upload Button
- Look for "Insert" then "Image" button in toolbar
- Click it
- Browse to your image file
- Select and upload
- Image appears in your experiment
Your image is now part of the experiment. It'll stay with your data forever. No more "where did I save that gel image?" moments.
Step 6: Save Your Experiment (30 Seconds)
Look for the "Save" button. It's prominent—blue, bottom or top-left of the form.
Click it.
That's it. Your experiment is saved.
Notice what just happened automatically:
- ✓ Date and time stamped (you didn't have to write the date)
- ✓ Attributed to you (your name is attached)
- ✓ Backed up (stored safely, not just on your computer)
- ✓ Searchable (you can find it anytime)
- ✓ Shareable (you can give others access if needed)
All automatic. You just typed your experiment and clicked save.
Step 7: Find It Again (1 Minute)
Let's prove the search works.
Go to the "Experiments" section in your top navigation. You'll see options for viewing your experiments—click "My Experiments" to see your complete list.
Your experiment appears in the recent list. But let's search for it.
Look for the search functionality (you can access comprehensive search from the My Experiments page).
Type in the search bar: PCR
Your experiment appears instantly. Click it. There it is—everything you just typed, the image, all of it.
Try another search: gel
Same experiment appears. Because you tagged it and because "gel" is in your protocol.
This is the power you just unlocked. Every word you type becomes searchable. Forever.
What You Just Did
In about 10 minutes, you:
- Logged into the ELabELN Suite
- Documented a complete experiment with protocol, observations, and results
- Added an image
- Organized it with categories and tags
- Saved it with automatic timestamping
- Searched and found it instantly
Compare that to your paper notebook:
- Would take 15-20 minutes to write out by hand
- You'd have to write the date manually
- The image would be a separate file on your phone or computer
- Finding it later would require flipping through pages
- Sharing it would mean photocopying or photographing pages
Or compare it to Word documents:
- You'd create a file, name it (what do you name it?)
- Save it somewhere (which folder?)
- The image might be embedded or might be a separate file
- Finding it later would require remembering the filename or folder
- Searching would only work if you remember which document to open
The digital lab notebook way is just... easier. That's the whole point.
Making It Even Faster: Templates
You just documented an experiment in about 5 minutes of typing. Want to make it even faster?
Create a template for experiments you do often.
For our gel example, you could create a "Gel Electrophoresis" template that has:
- Section headers already there (Objective, Materials, Protocol, Results, Conclusion)
- Standard materials pre-filled (1% agarose gel, TAE buffer, etc.)
- Common protocol steps already listed
Then when you run another gel, you click "Create from Template," choose your gel template, and everything is pre-populated. You just modify the specific details (sample names, observations, etc.) and save.
Time to document with a template: 2-3 minutes.
How to Create a Template:
- Go to Experiments → Experiment Templates
- Click "Create" on the top right
- Fill it out like an experiment, but use [brackets] or generic text for things that change
- Save it
- Next time you create an experiment, choose "Use Template" and select yours
That's advanced mode. Start with documenting a few experiments manually first. Once you notice you're typing the same things repeatedly, create a template.
Common Questions After Your First Experiment
"Can I edit my experiment after I save it?"
Yes. Open it and click "Edit" (pencil icon or button). Make your changes. Save again. That simple.
ELabELN tracks changes automatically, so you have a record of what was modified and when.
"What if I make a mistake?"
Just edit and fix it. Unlike paper (where you'd have to cross out and write in margins), digital lets you fix cleanly.
The timestamp and edit history show when changes were made, so you still have an audit trail if needed.
"Can I delete experiments?"
Yes, but ELabELN soft deletes rather than permanently delete. You can remove things from your active view but keep them in the system for record-keeping.
"How do I organize hundreds of experiments?"
Categories, tags, and statuses. Use categories for broad groupings (Molecular Biology, Cell Culture, etc.). Use tags for specific topics (specific gene names, techniques, projects). Use statuses to track progress (In Progress, Completed, Failed, etc.).
And remember: search works. Even with 500 experiments, you can find the one you need in seconds by going to your Experiments section and using the search function.
"Can my PI or lab mates see my experiments?"
Only if you share them. By default, experiments are private to you. You control who can view or edit each experiment.
Want your PI to review something? Share that specific experiment with them. Want your whole lab to see protocols? Share those with the team. You choose.
What's Next?
You now know how to document experiments digitally. You've done it once. The second time will be faster. By the fifth time, you won't think about it—it'll just be how you document.
Here's what to do next:
- Document your next 3-5 experiments the same way you just did. Get comfortable with the workflow.
- Create your first template for an experiment type you do often. Feel the time savings.
- Try the search a few times. Go to your My Experiments page, search for an old experiment by technique, date, or keyword. Watch it appear instantly.
- Share one experiment with a colleague. Show them how easy it is to give access instead of emailing files.
- Explore other features as you need them: linking experiments, adding notes, exporting PDFs, whatever comes up in your work.
The goal isn't to learn every feature. The goal is to make documentation easier than what you're doing now.
And you just proved it's possible. In 10 minutes.
If you have any questions or need assistance along the way, contact us anytime. Our team is here to help.
You're Not Starting From Scratch
One last thing: you don't have to abandon your paper notebooks or migrate your old Word files.
Start fresh. Your next experiment goes in ELabELN. The one after that too. Keep your old notebooks for reference—they're not going anywhere.
Over time, you'll naturally accumulate experiments in your digital system. Six months from now, when you need to find that antibody dilution you tested, you'll go to your Experiments section, search your ELabELN, and find it in 3 seconds instead of digging through three notebooks for 20 minutes.
That's when you'll realize: this isn't extra work. It's less work. Significantly less.
Next week, we're diving into one of the features people love most: the search and organization system. How to make finding any experiment—even months or years later—feel effortless.
Get the Next Guide in Your Inbox
This is Part 3 of our 7-part series on making lab documentation easier. Each week, we publish a new guide and share it first with our newsletter subscribers.
Sign up for our newsletter to get the next article as soon as it drops, plus practical tips and insights you won't find on the blog.
Next week: "How to Find Any Experiment in Seconds (Never Search Again)"
Ready to Document Your First Experiment?
You just saw exactly how it works, and it really is that simple. ELabELN lets your entire lab document experiments in minutes with instant search, automatic timestamping, and shared protocols that paper notebooks can't match. Get started today to schedule a demo and see it in action.
"*" indicates required fields
© LabLynx, Inc. All Rights Reserved. LabLynx®, ELabELN™, and related marks are trademarks of LabLynx, Inc. This document may reference or interoperate with third-party technologies including Nextcloud®, ELabFTW®, and Node-RED®, whose respective copyrights, trademarks, and licenses remain the property of their owners. Nextcloud source code and license: https://github.com/nextcloud/server; ELabFTW source code and license: https://github.com/elabftw/elabftw; Node-RED source code and license: https://github.com/node-red/node-red. All third-party software is subject to its own licensing terms. Information provided herein is for informational purposes only and is not legal, technical, or professional advice. Product features and specifications are subject to change without notice.